
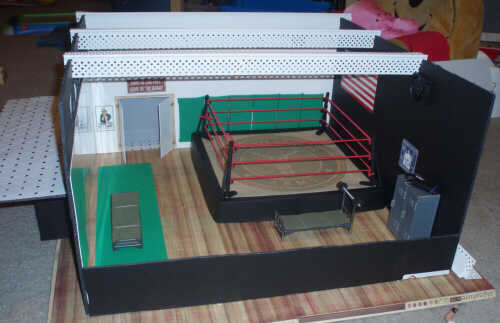


I marked out a 2" x 2" border on the wood, sketching in where the doors would go, then where the nail 'struts' would go. Before setting the walls, I laid the 'flooring', four pieces of wood grain scrapbook paper, poking them through the nails. (This was a /lot/ easier than nailing through carpet, like how I did with the rec room!). I cut the first wall to the same size as my PIT Rec Room, which follows similar construction, but when I set the boxing ring next to it, I knew I had a problem: the wall was too short. Thus, the idea for the observation deck.
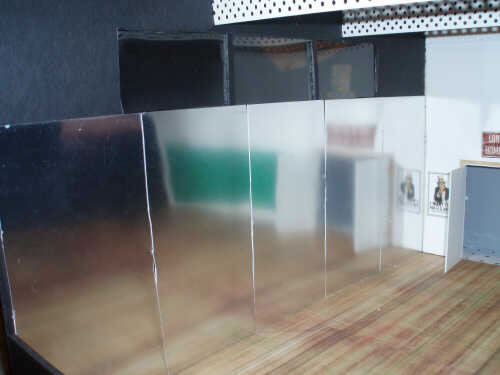
From the extra pieces I cut for the original height of the wall, I was able to create the observation deck floor, braces, and the second floor wall. For the rear and far walls, more foamcore was cut to the new 'double' height. I chose the white to contrast the black. The mirrored sheet styrene came as half-sheets. I cut these into thirds to get that regular 'seam' to represent multiple panes of mirrors set side by side. (Besides, as it took 2 pages worth of the styrene, I'd have to have one seam already.) Placing these before gluing on the observation wall's second floor turned out to be a good thing; the mirror's natural height would put a window at the Joes' waist level, giving me an initial line to work with.
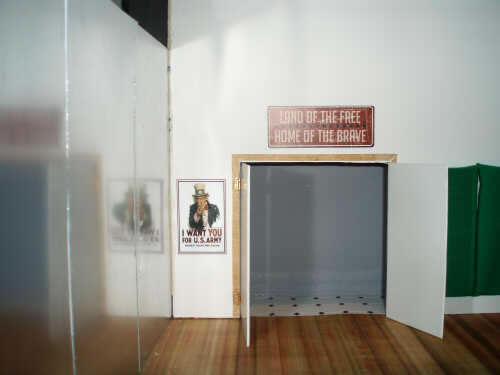
The windows are cut out of more sheet styrene and set into grooves cut in the middle of the foam, then I went about hanging the doors. I've hung a few RL doors, and I have to say that hanging 1:18 scale doors is more difficult! I had to glue the hinges rather than nail in the brads, because of the doors' hard styrene base and marginal thickness.The one will not close all the way; I have the angle off by a hair, so it drags the ground when at a certain closeness to the door. I took a page from high school and college gyms, which (well, mine did!) have padded walls. I didn't like any of the colors of the foam I found, but I liked the shape. So, I covered the pads using glue and strapping tape to hold it tight, then glued each to the wall.
Finishing touches are largely odds and ends I found at the Hobby Lobby and scrapbook stores, although the rafters I happened upon at Home Depot. I didn't want to spend $40 on a WWF cage for the metal tube rafters, and while wandering the aisles in HD, I found the plastic corner braces builders use to protect wall corners under plaster. (This has a name. I've forgotten it.) This worked exceptionally well to pull the two sides together and provide no gaps in the corner seams with the back wall. Finally, I found the air handler fan and the loudspeaker in the parts bins at Radio Shack. On a lark, I cut small holes and threaded the wires through these, then glued down the hardware. So, if I add a battery, these are practicals!
Additions: I'm working on a tall heavy bag / tackling dummy for my next dio-issue. Also, when Michaels' Lenax villages go on clearance, I may pick up other lighting and really wire this building up.

by : Midgarn
Base: 2'x2', 7-layer plywood
Wall studs: 2" nails
Walls: White and black foamcore; light gray foamcore for the first floor hallway.
Observation deck: foamcore.
Windows: clear sheet styrene with foamcore panes.
Mirrors: sheet styrene
Doors: sheet styrene and dollhouse door hinges.
Observation deck and hallway flooring: dollhouse tile floor
Gym flooring: scrapbook paper
Air handler: computer fan (Radio Shack)
Loudspeaker: Radio Shack speaker component with strainer grating cut and fit.
Rafters: Plastic corner moulding (for walls under plaster)
Wall pads: foam door hangers (Do not disturb variety) covered in fabric
Uncle Sam poster: Dollhouse accessory.
Other posters, flag: Scrapbook appliques.
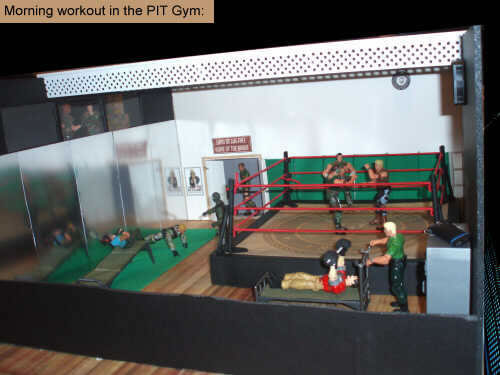
Boxing ring: WWE "Havoc unleashed" with scrapbook paper 'mat'
Floor mats: foam
Lockers: PTE barracks set
Weight bench: bottom half of PTE bunkbed, with VvV T-Crotch Slice inner 'action attack' for the barbell handles.
Slant bench: top half of PTE bunkbed.
Barbell: threaded bolt + sliced-up rubber stopper.